Stencil Masking
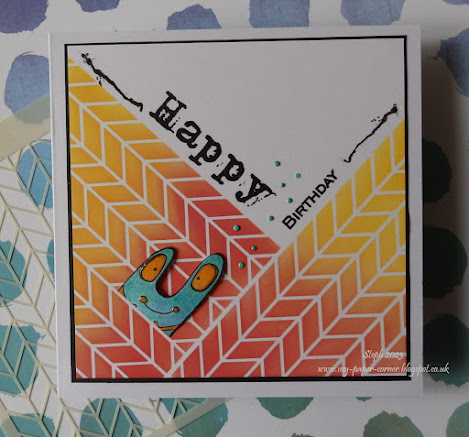
After feeling a bit rough with a head cold for the past week I needed to create something simple to get back on track with up coming birthdays so I decided to mask off areas of a herringbone stencil to create a different look for a change on this card. First portion inked was in the bottom right corner then the second portion next to it at right angles leaving an area of white open space at the top for the sentiment.
I blended just two colours of distress oxide inks: fired brick and wild honey. Sentiment was simply stamped in black ink along the top lines with a distress element line stamp to extend the design. Then decided the head of a little monster with his big eyes and smile would be fun to include. He's still smiling even though I've chopped off his bottom half! He's been stamped, fussy cut and coloured with polychromo pencils. Added glossy accents on his eyes and dimples. A cluster of die cut dots to embellish in the same colour as the monster.
I've used - 6x6" white card base
Funky Fossil - herringbone stencil
Distress Oxide inks; Faber Castell Polychromos
Funky Fossil stamp sets - Motley Crew, Happy Words & Distressed Elements
Linking up with -
March Stencil Fun Challenge - ATG March Challenge - ATG March Stencil Challenge - ATG


This is an awesome card love it
ReplyDeleteGinny
My Blog As I do Rodos
Fabulous card ,love the stencilled background and cute monsters head lol
ReplyDeleteCarol x
What a fun card design and love how the little creature is peeking out. So cute and great choice of colors!
ReplyDeleteThanks so much for sharing at my Crafty Wednesday challenge!
Ellie
Ellibelle's Corner
Super creative and fun!
ReplyDeleteThank you for joining our challenge at Stencil Fun!
Diane SF Co-Owner
{Nellies Nest}
{Stencil Fun}
{Triple B} NEW March 3rd
Fantastic design, so effective. I hope you are feeling better nowxx
ReplyDeleteLove the angled stenciling - great blending too - Thanks for joining in at HLS Stencil
ReplyDelete