Posts

Showing posts from 2019

December Birthday Dragonflies

Image
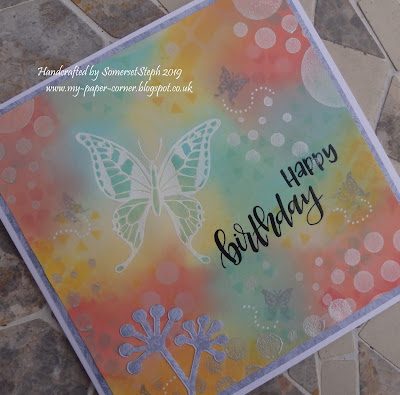
After completing all of my Christmas cards this year I had fun creating this birthday card with lots of inks and different techniques for a fellow crafter who has a birthday this week.  I started off with a piece of white stencil card and stamped/embossed using white EP a dragonfly to act as a resist.  I chose two distress oxide inks, wild honey for the base layer and spiced marmalade with a stencil. After the base layer was applied I brushed over a mechanical mesh stencil in random places then misted the stencil with water to transfer any remaining ink which gave the thinner line patterns.  Various Craft Stamper cover mount stamps were stamped along two edges with sweet plum memento ink and also for the main sentiment which was embossed using clear EP to give it a darker tone. The die cut dragonfly started life as silver mirri card which had terracotta & pumpkin promarkers scribbled on then heat embossed with clear EP so the colours would not rub off in an oxidized

Ink Blended Dragonfly

Image
My card share today was inspired by  AAA Cards: CAS Game #154  Made in Minutes + Optional Twist Ink Blending.  I decided to create a one layer card using just the middle one third of my card base which I made from white pearlised card as I love the shimmer finish and it takes ink really well. Three distress inks were blended with brushes over a masked area in diagonal sweeps before stamping the dragonfly and sentiment in a coordinating coloured ink.  Love the style of the sentiment font as it looks like the dragonfly has written 'hello' in it's flight across the card!  Added a few drops of glossy accents in opposite corners and along the body of the dragonfly for a tactile finish and they catch the light too. I've used - A6 card base (tent fold) Distress inks - dusty concord, tumbled glass, crushed olive Claritystamp dragonfly stamp Docrafts sentiment stamp Linking up with - AAA Cards: CAS Game #154                 Addicted to Stamps and Mor

Birthday Butterflies

Image
This card turned out quite soft and dreamy which was not my original intention!  I started with a piece of watercolour card and stamped/embossed with white EP the large butterfly before blending distress oxide inks over the whole panel and spritzing with water.  Once dry used various stencils with the same inks to create patterns in the background then pigment ink through a bubbles stencil for a Bokeh effect. The main butterfly was painted in with more cracked pistachio ink to accent it a little more, then added a few smaller stamped butterflies with white dot trails, a stamped/embossed sentiment and wildflower die cut to finish from the same paper as the matt layer. I've used - 6x6” white card base Card Making Magic mag freebie butterfly stamps Sentiment stamps by Ranger Letter it DO inks – cracked pistachio, wild honey, abandoned coral Brilliance archival pigment ink – platinum planet Crafters Companion wildflower trio die Playing along with - Litt

Santa's Snowy Sleigh Ride

Image
I was inspired by the recent challenge sketch layout set by  Freshly Made Sketches  as I had in mind to use an embossed panel across my card created from a letterpress technique.  Just love how the reindeer and snowflakes stay white with the blue inked sky behind.  Santa on his sleigh is a die cut silhouette which came with the EF. I've added two stamped presents coloured with promarkers, highlighted with pops of colour from glitter pens, a stamped sentiment strip and embellished with a couple of die cut snowflakes.  The snowflake patterned paper matt is really old stash and goes with the overall blue tones I wanted to achieve. I've used -  13.5 cm sq white card base Mag freebie EF & Santa silhouette die  Stonewashed Adirondack ink Anita’s Christmas Blue patterned paper Mag freebie Nitwit present stamps Promarkers & glitter pens Xcut mini snowflake die &  The Range mini snowflake die Playing along with - Freshly Made Sketches  #411

CAS Stencil November Challenge

Image
Today I'm sharing a card made for the November  CAS Stencil Challenge  which this month is featuring stencil monoprinting.  As I'm still in the throes of making this year's Christmas cards I chose a poinsettia design to work with which had mixed results so the portion you can see on my card is just the best part of what I ended up with! The ink didn't take very well on the actual poinsettias but I think you can still see flower shapes as the ink concentrated more in between.  I used two distress inks (ripe persimmon & crushed olive) on watercolour card, die cutting a panel using the outer two dies from a striplet set as I quite like the frame.  Added a die cut poinsettia in richer colours as a focal point. I have to admit that I did not plan in advance which sentiment I was going to use until after I had adhered my panel & poinsettia flower to the card base.  I did panic slightly but my trusty stamping platform coped with the added height of the die cut

Frosty Friends Christmas

Image
I'm sharing three cards featuring some of the cute characters using the Frosty Friends stamp set from issue 75 of Creative Stamping mag by Clearly Besotted.  My sledging penguin having fun in the snow has a backdrop of an igloo made from a die cut circle embossed with a brick stencil.  There's some added frosted lace stickles and fluffy stuff. Next comes a clean and simple style card with a little elf snuggled into the top of a stocking stamped on some patterned paper.  I did use a sentiment from a different set as I preferred the style of the lettering.  Embellished with a scattering of die cut stars. It's Christmoose!  I stamped the moose amongst trees on a hillside and die cut into an oval to use as a topper for the patterned papers behind, top section has been over stamped with snowflakes and a couple of hearts, bottom section has added die cut snowflakes. There are lots more stamps in the set I've yet to create with, some can be used all year

Tim Holtz Christmas

Image
Today I'm sharing a couple of Christmas cards using two Tim Holtz die sets (Christmas circle words & festive repeats) which I've found are very versatile as many of the elements can be used all year round, a definite bonus.  This first little card has a die cut grid background and two hanging paper-pieced baubles for Dec 25th in grey and red with a splash of green foliage mounted on a grey matt layer. For my second card I chose to die cut the elements out of the white matt layer so the gold card base could show through.  I've had the gold die cut tree in my stash for such a long time so decided to emboss a tree on top for added texture and raised it on foam pads.  A lovely Christmas script sentiment was heat embossed with gold EP. I've used -   4x4" & A6 card bases Sizzix thinlits Tim Holtz festive repeat & circle words Christmas dies Mag freebies - foliage die, sentiment stamp, tree EF Linking up wit

CAS Stencil October Challenge

Image
This month's  CAS Stencil Challenge  is to stencil over the top of patterned paper ... okay, yes I admit I have a lot of patterned papers waiting to see the light of day ... took a while to pick what to use but I settled on a subtle rose pattern. I placed two stencils on my patterned paper at the same time, the heart over the top of the diamonds to combine an open shape with a detailed pattern and applied distress oxide ink.  Once that was dry and die cut into a circle the little butterfly stencil was added, one on the patterned paper and one partly on/off onto the card base. You might just be able to see a pair of border score lines to frame the design, this was achieved by dry embossing two of my square nesting dies directly onto the card base as I felt it looked a little plain otherwise.  The same DO colour was used on the sentiment to match the butterflies.  Here's a picture of the stencils and inks used. I've used - 5x5" scalloped edge white

Happy Prosecco & Cake Day

Image
Today I'm sharing a fun girly card which is a style I don't often do ... this young lady is certainly enjoying herself with Prosecco & cake!  I did enjoy colouring her with my promarkers and achieving the shading on her dress.  I added some glitter pen to the stem of the wine glass for a more sophisticated look. As I had chosen some old stash patterned paper which had cakes with wings I searched online for a suitable saying and found 'Happy Prosecco & Cake Day aka Birthday' which seemed perfect.  Simply embellished with a scattering of sequins. I've used - 6x6" scalloped edge white card base patterned paper from Docrafts Born to Shop Bubbles pad Gifted image coloured with promarkers Computer generated sentiment (Hallegh font) Creative Dies stitched & pierced ovals set Linking up with - Watercooler Wednesday  WWC241 - Dawn's Feminine "Anything Goes" Challenge Thank you for visiting - I'd love you to leav

Thanks Friend

Image
I'm sharing a couple of Thank You cards I've made recently ... one CAS and one very busy on your eyes ... you have been warned!  For my CAS card everything was stamped directly onto the card base ... I do love Autumn colours and just chose two to create my card. I first placed a strip of masking tape across the card front near the top and stamped two different leaves using red and yellow pigment ink pads overlapping them slightly.  A horizontal line was then scored above.  'Thanks' was stamped above centre and 'friend’ below right.  Added a few die cut circles as embellishments and some glossy accents for highlights. I've used - A6 cream landscape card base Leaves from Creative Stamping mag issue 60 Sentiment - mag freebie Ranger LETTERit stamps Papermania pigment ink pads Playing along with - Allsorts Challenge  Week 538 - Trees and Leaves Krafty Chicks   Challenge #473 - Thank You Card Creative Friday  # 239 - Friendshi

Woodland Friends

Image
Sunday Stamps  current colour challenge has a gorgeous Autumn palette which I've used in this card featuring some woodland animals, the layout is from a sketch challenge with friends/members over on the docrafts gallery.  All of the stamps are from the Autumnal Treasures set from last year’s Creative Stamping mag issue 60. I started with the animals colouring them with promarkers and die cut into ovals mounted over a leafy stamped background strip using pigment ink pads.  I also stamped the squirrel onto the background to show more of it's body and so I could raise up the centre oval and tuck behind the two smaller ones. Here's the sketch I followed I didn't want to add too many more layers so stamped directly onto the card base top and bottom to add a sentiment and some leaves/berries/acorn.  I wish we did have red squirrels here in the South West, I'd love to see one, but we only have greys ... I've used - 5x7" landscape white card

Two Seaside Scenes

Image
Today I'm sharing two totally different seaside scene cards ... this first card features stamped beach huts and seagulls coloured with promarkers with added watercolour pencils and brushos for the sand and sky.  I used a heavyweight stamping card which stood up well to all the different mediums used.  For added texture there is some seafoam EP along the bottom edge. Here are the stamps I've used along with the post it masks which helped for a seamless scene across the card. I've used -  5x7" white card base Hunkydory 240gm Stamping Card Mag freebie Summer stamp set ChristinesCraftyart Seaside Landscape stamp set Promarkers,  Watercolour pencils,  Ultramarine brusho Papermania Seafoam EP Linking up with - Through The Craft Room Door  - Anything Goes Challenge A Place To Start  - Anything Goes + Optional Twist: Show Us Your Masking *      *      *      *      *      *      *      *      *      * My second card which I made last