Posts

Showing posts from 2020

Sew Happy Birthday

Image
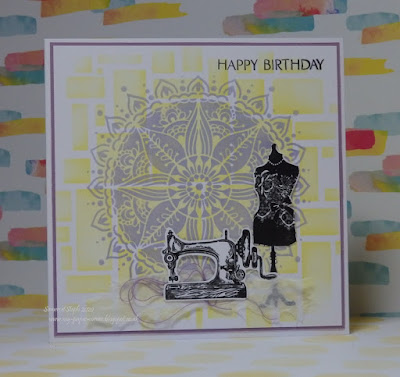
 A December birthday card for a fellow paper crafter who also makes clothes hence the sewing theme. Started with a layered stencilled background using two colours of distress oxides, firstly the abstract squares then the mandala over the top. I so loved the pattern of this mandala stencil that I didn't want to cover too much of it up so decided to group the sewing machine and mannequin in one corner which were stamped, clear heat embossed, fussy cut and shaped with a ball tool.  I tucked a piece of torn white mulberry paper and some thread behind the sewing machine before mounting the images with silicone gel. Finished with a simple stamped sentiment for, I hope, a classy look. I've used - 6x6"   white square card blank Stencils – Claritystamp abstract squares 2; Funky Fossil Indian Mandala DO’s - squeezed lemonade, shaded lilac Stamps – Mag freebie dressmakers’ mannequin, Phill Martin vintage sewing machine Linking up with - Watercooler Wednesday  WWC301 - Dawn's Chal

Butterfly Birthday

Image
Makes a welcome change to create a birthday card in amongst all the festive cards of late especially as this one was for a fellow crafter.  Now I've always admired others that achieve great watercolour effect backgrounds ... I still need to practice more but I like how this one turned out!  This was a wet on wet technique with mainly leaf green brusho with a little emerald green and yellow mixed in as well. Once dry I've overstamped and heat embossed with white EP one corner and stamped other areas with distress inks to create some patterns using a distress elements stamp set.  The geo butterfly was stamped in red and also heat embossed with clear EP so the promarker colours didn't seep into each other.  This was fussy cut, shaped with a ball tool and adhered by just the body so the wings can lift up slightly. To balance the design a sentiment was stamped in the top open area and the whole panel matted on red to echo the colour of the butterfly. I've used - 6x6" wh

Christmas Poinsettias

Image
Came across another new challenge blog that caught my attention  Let's Squash It!!  The Embossing Folder Challenge.  Took me a little while to get round to making this card but I was inspired by an embossing folder techniques video over on CraftWorld by Sam Calcott.  Coincidentally  Christmas Kickstart  also has the same theme to use a Christmas EP and stamp. One of Sam's fun 5 ways reminded me that I had forgotten about the letterpress technique which I've used on the poinsettia EF by inking one side with a distress oxide pad and brayer before running through my Big Shot to transfer the ink onto the background and leave the raised mini poinsettias white.  I've used linen effect cardstock so the background is lighter and textured.  Large poinsettia flower stamped in a brighter red ink, clear embossed then fussy cut and assembled with leaves behind and a gold embossed flower centre. Sentiment embossed in white on the same pear green coloured paper which I've used th

Off the Edge Watercoloured Snowman

Image
I don't normally take part in watercolour challenges because it's one of my least favourite techniques and I really need more practice but to get a wriggle on with making more Christmas cards I challenged myself to create something for  CAS Mix Up  this month for their rotation of watercolour with a prompt of 'off the edge'.  I'm also going to play along with the  Paper Players  current CAS challenge as their theme is 'any holiday of your choice'. My merry snowman was stamped on a separate panel and clear embossed, watercoloured loosely with distress inks in blues as well as the ground around him then with orange for his hat and scarf.  Decided on a partial die cutting technique so my snowman's head could be above the top of my card base where I die cut the top away in a matching wavy border. Scary die cutting steps trying not to cut his head off!  Glad I did a mock up in paper first as I really didn't know if my idea was going to work and if I could

Rustic Christmas Heart Wreath

Image
I first saw the colour promt at  Color Hues #5  to use yellow and kraft then a few days later  CAS Christmas  wanted us to use non-traditional colours ... hmmm could the two work together?  I already had out on my desk a magazine stamp set from last year which I wanted to use again and this is the result a rustic Christmas wreath with presents. My kraft card is really brown compared to some others so I decided to stamp with brown pigment ink and clear heat emboss so my water colouring would stay inside the design ... that tested my eyesight especially as the mistletoe berries were tiny!  Did you know there is a European yellow mistletoe?  The leaves are green but I've painted mine in neutral. The presents and bow are fussy cut, shaped and mounted with silicone.  Took an absolute age to decide the final placement of the presents but I'm sort of happy now with the layout.  Finishing touches some white dots with a gelly roll pen.   I've used - 6x6" white card base Paperma

Tone on Tone Stencilling

Image
October's  CAS Mix Up  card challenge has a rotation of us using stencils this month with a prompt of tone on tone. I die cut a large star from a stencil sheet, placed the aperture on the edge of my textured cardstock and brushed over abandoned coral DO.  Keeping that stencil taped down I placed over a fireworks stencil from Funky Fossil which I've inked with fired brick DO as I thought the design would work as a snowflakes pattern.  I did splatter the area with white gesso just to add some interest otherwise it seemed too flat. Added a very fine die cut festive sentiment and small die cut snowflakes which have some stickles/art glitter in the centre.  Finishing touch ... three small coloured dots around the sentiment to help focus your eye ... I'm definitely getting more comfortable about leaving open/white space now 😊. I've used - 13.5 cm sq white card base Linen structure white cardstock Stix2 die cut stencil sheet Funky Fossil Fireworks stencil Creative Dies star d

Quirky Christmas Bird

Image
A quick post with a card for two challenges  CAS Christmas Card  where October's theme is Christmas Birds and  Christmas 24  #019 Winter Birds.  My quirky bird has his festive hat on and there's a little dove flying down with a sprig of olive. A couple of distress oxides inks were blended on a piece of pearlised white card, over stamped and heat embossed with gold EP.  The panel buffs up to a lovely shine afterwards and is adhered to a white card base.  Despite using an anti static bag I've still got specks of gold EP especially around my sentiment which finally disintegrated on me having succumbed to hot summer temperatures.  Hey-ho ... it was old and I had been nursing it along as I liked that it read vertically. Photographs taken on a wet showery day so no shine captured I'm afraid. I've used - A6 white card base Pearlised white card from stash Distress Oxides - fired brick, squeezed lemonade Craft Stamper cover mount quirky bird & foliage stamps Papermania d

Make-Up pop up Slider card

Image
A while back I was lucky enough to win two Made to Surprise Super Sliders Collection die sets designed by Sam Calcott and a co-ordinating make-up stamp set from Craft Stash during a live demo on CraftWorld by Sam as she was launching her new range.  It's taken me a long time to complete this as I had several other projects on the go already and this set took me right out of my comfort zone as I rarely make feminine girly cards! I do love the pop up slider style and made the base from kraft card over stamping with VersaMark ink for a watermark effect. Some of the stamped make up items (coloured with promarkers) were arranged on the centre pop up section (perfume bottle raised on foam pads, nail polish, lipstick and lips shaped and adhered with silicone gel).  These stamps have co-ordinating dies so no fussy cutting!  Added a few die cuts above - the purple marbled card I've had in my stash for years.  Finishing touches with some gold gel pen highlights for even more sophisticat

Let it Snow

Image
Crafting has been a bit hit and miss for me of late as family life has just got in the way but at last a Christmas card made for two challenges, a late entry for  September's CAS Mix Up  and a new colour challenge that has caught my interest called  Color Hues . I masked off a panel on the front of my card base and blended a mix of blue inks to create an ombre effect from turquoise to navy with a few splatters of water to add interest and lift some of the ink.  I've not embossed with dies very much so had to hunt where I had written down the sandwich for my Big Shot!  I'd forgotten how little pressure was needed to get a lovely embossed impression.  I chose a few snowflake dies and positioned them partly on/off my inked panel to widen the overall design then stamped the gorgeous sentiment at the bottom (I do love this flowing font) and a few falling little snowflakes all in navy blue. Some finishing touches just to edge the inked panel with a navy glitter gel pen and some a

CAS Christmas Challenge - Guest Designer Card

Image
Excited to be sharing my guest designer card for September's  CAS Christmas  card challenge where this month's theme is Christmas Tree.  I was their winning card in July, you can see it  here . I reached for my all time favourite Christmas tree stamp from an enchanted Christmas set by Hot off the Press.  A solid stamp with a lovely flourish design and snowflakes as part of the tree itself.  First I heat embossed the tree with white EP then positioned a circle stencil partly over so I could dab using cling film some pearl effects before sponging with distress inks to create a snowy sky backdrop.  Both the tree and pearl effects act as a resist and buff up to a lovely shine. I've ended up with a contemporary colour palette with an emphasis on lighter shades of purple with touches of blue and turquoise as the three DIs were still out on my desk from a previous project so I just went with them.  Finishing touches are three stamped and embossed snowflakes with coloured dot centr

Julie Hickey Floral Frames

Image
A few months back I was experimenting spraying brushos over/through a stencil then took a print off the stencil with what ink was left behind.  This card uses the stencil print which is a more delicate and softer result.  Used a Papermania geometric circles stencil with scarlet & yellow brushos mixed in mister bottles. One of the floral frames from Julie Hickey's set was stamped and embossed with gold EP on part of the stencil print where the colour was more orange/yellow and cut into squares.  I used the more red/pink part for my base layer.  Matted everything on gold card and also cut two ribbon strips.  The layout follows Freshly Made Sketches #229 from 2016 which I happened to come across on Pinterest. Added some enamel accents, sequins and a white embossed sentiment on red card as finishing touches. I've used - A6 white card base Papermania  geometric circles stencil Scarlet & yellow Brushos Julie Hickey Floral Frames stamp Elizabeth Craft Ribbons & Jewels die