Posts

Showing posts from 2023

Card-io Melting Snowman

Image
My final story scene created with Card-io stamps and the third of the snowmen characters.  Mr Snowman is wishing for more snow to fall so his animal friends can help build him back up in time for Christmas Day as he's started to have a melt down! Mr Snowman does look a little sad don't you think but let's hope his wish comes true ... The half circle twiggy wreath is stamped with 1st, 2nd & 3rd generations in tones of blue and grey inks for a frosty feel.  Hand drawn blue baubles using a gel pen.  Dots of fluffy stuff for a snow line across the base of Mr Snowman.  Stencil butter crescent moon and tumbling stars for added texture.  Colouring pencils to give the moon some warmth.  A few highlights here and there with a glitter gel pen. I've used - 13.5 cm sq white card base Card-io stamp sets:  Festive Breeze (snowman), Oriental Blossom (twiggy wreath & leaf), Cottontail Capers (rabbits), Peaceful Place (bird & small leaves) Inks: VersaFine C...

Wildflower Fox

Image
This card features a lovely fox stamp gazing out from a crescent moon with foliage called Wildflower Fox designed by Olga Heldwein for Funky Fossil. Main image coloured with polychromos, fussy cut and adhered with a mix of wet glue and 1mm foam pads on a piece of Dreamscapes paper which has lovely golden bubbles below a stary sky.  I did stamp and emboss in gold the same main image on the paper first some of which you can see peeping behind just to add more interest.  Sentiment heat embossed in white as well as a couple of the smaller flowers from the same stamp set again coloured with polychromos.  Three rub on transfer flowers added bottom left. Showing main coloured image & gold embossing behind I've used -  6x6" kraft card base Funky Fossil stamp set: Wildflower Fox by Olga Heldwein Funky Fossil paper pad: Dreamscapes Funky Fossil rub on transfers: Summer Twilight Faber-Castell polychromo pencils Linking up with -         Ellibelle's ...

Card-io Catching Bubbles

Image
Another story scene created with Card-io stamps featuring the second of the snowmen characters.  Not sure if these bubbles will survive on the bare tree branches or in Mr Snowman's twiggy hands if he catches one but he's clearly having fun with his friends on the chilly snow-laden hillside. The top of the panel has distress oxide inks brushed and blended to create a sky with torn paper mask to define a hill line before stamping all the images.  Sky was flicked with water to create bleached areas. Paper mask and blue ink used on the white snow to give more depth.  White gel pen snow highlights on the tree branches.  Bubbles drawn on the inside of circle stencils with white gel pen adding highlights with colour pencils in red, blue & yellow. I've used - 13.5 cm sq white card base Card-io stamp sets:  Festive Breeze (snowman), Cottontail Capers (rabbits), Peaceful Place (tree & bird), Breezy Day (tree branches), Textures (grass/foliage) Distress oxides: mer...

Card-io Festive Gathering

Image
Oh no! Mr snowman's top hat has taken off in the breeze.  Created this outdoors design direct onto the card base combing a few different Card-io stamp sets for a sepia look.  Northern lights sky and touches of red in the twiggy wreath where two little robins are perched while their rabbit friend watches on from the side-line in amusement.  I bought a new set of snowmen stamps at a craft fair recently, all three have personality and are fast becoming my favourites just because of their expressions and arm placement so you can tell a story.  I'll be creating with the other two soon. VersaClair pinecone and Memento rich cocoa were used for the stamping and VersaColor inks for the northern lights.  Red gel pen and white gelly roll pen for highlights.  Undecided whether to add a sentiment on the front or leave it as is. I've used -  Card-io stamp sets: Festive Breeze (snowman), Oriental Blossom (twiggy wreath), Cottontail Capers (rabbit), Peaceful Place (bi...

Wobbler Halloween Spooky House

Image
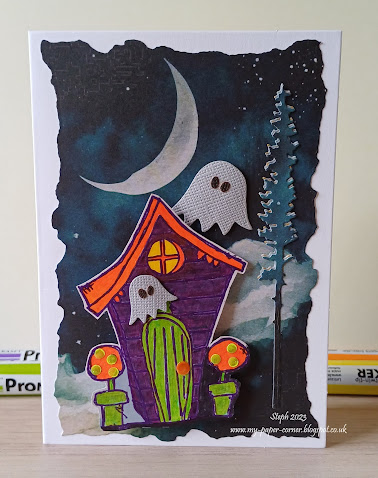
I don't take part in all things Halloween normally however I have one crafty friend that absolutely loves this time of the year.  I decided to make a card for her and her son to enjoy and came up with this wobbler Halloween spooky house design using Funky Fossil items I had in my stash. House stamped and fussy cut, coloured with colouring pencils then went over the top with alcohol markers for a more vibrant look.  Added neon green dots on the pot plants and a neon orange dot on the door knob.  The die cut ghosts are upside down flower heads with die cut waste for eyes.  Background patterned paper die cut with an edges die for a torn look.  Silhouette tree die cut has a vellum drop shadow.  Made my own wobbler element from beading wire and die cut circles placed behind the spooky house.  The short video below shows the wobbling house in action. I've used - A6 white card base Funky Fossil Rock Chick by Zinski Art stamp set (house) Funky Fossil Dreamscap...

Falling for Autumn

Image
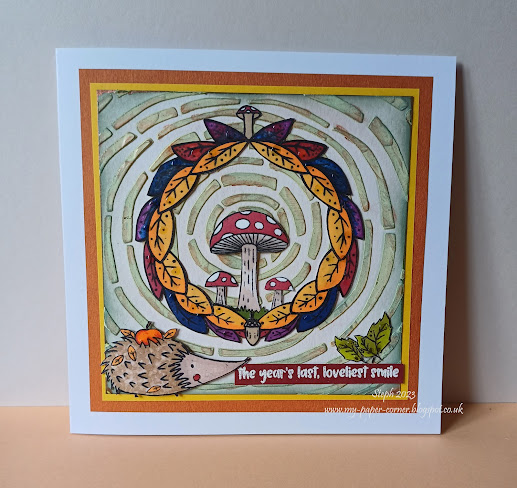
I do love the seasonal colours of Autumn and this cute hedgehog carrying his lunch on his back.  I also had another venture into using texture paste to create the background. I mixed a few drops of citrus lime intense pigment stain into some white texture paste and applied it through a stencil, the design reminded me of tree rings.  Once dry I lightly sponged over the panel with green distress oxide ink.  Again when dry I used a watermark pen to add touches of ink to some areas so that I could brush on some bronze mica powder which catches the light. All the stamped images were coloured with alcohol markers, fussy cut and adhered with a mixture of 1mm foam pads and wet glue.  Sentiment stamped and embossed with white EP on red card to match the colour of the toadstools.  Added glossy accents on the apple and leaves. I've used - 6x6" white card base Funky Fossil stamp set - Falling for Autumn;  Promarkers Funky Fossil stencil - Membrane Faber-Castell mixed m...

Have a Wild Birthday

Image
I haven't followed a sketch layout for such a long time.  When I saw the current sketch challenge at  The Paper Players  I took that inspiration for this birthday card.  I had already planned on using the covermount safari stamps from issue 121 of Creative Stamping mag and in particular the giraffe. I started by randomly stamping four of the leaves to make a background panel using green ink.  Various green/blue distress inks were used to watercolour them before cutting into four strips.  Love the doodle/tangle patterns on the giraffe which was stamped using brown ink and watercoloured with brush markers. The giraffe was in danger of being lost against the background so the middle two strips were covered with some graduated coloured vellum from my stash before arranging on a pastel coloured mat.  Giraffe and sentiment fussy cut and mounted with foam pads. I've used - 5x7" cream card base Safari stamps - issue 121 Creative Stamping mag VersaFine Clair in...

100 Birthday Wishes

Image
Made for the uncle of a crafting friend celebrating his 100th birthday who still enjoys a bit of gardening.  Card Making Magic's Spring Garden stamp set that came with issue 119 of Creative Stamping seemed ideal to use and I also wanted to have lots of colour so what better than a rainbow background. Distress oxide inks were brushed over a stencil to create the abstract background then water drops flicked over to create some interest.  Gardening images stamped in brown ink directly onto the panel with masks used so the hand tools could be stamped behind the flower pots.  Images were coloured with a mixture of polychromos, metallic pencils and gel pens with added white gel pen highlights. Number 100 stamped in green ink with a bracket below again with some white gel highlights ... a topiary sculpture maybe?  White embossed sentiment on the same colour card as the matt layer. I've used - 6x6" white card base Issue 119 Creative Stamping covermount Claritystamp abstract ...

90 Birthday Candles

Image
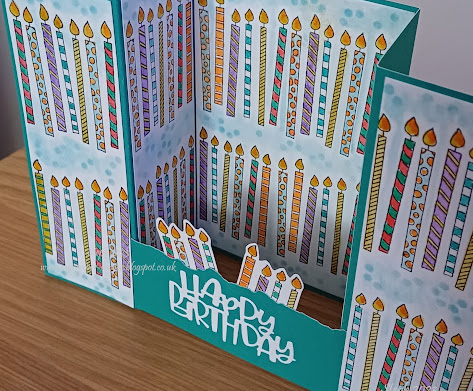
Yes there are 90 candles on this bridge fold card made for my Dad's recent 90th birthday.  He wasn't really keen on reaching this milestone so decided not to put 90 on the front, instead came up with this design.  Not easy to photograph though. Each of the four slim panels has 14 candles, back panel has 26 and the front bridge panel has 8 (56+26+8=90).  Made with an A7 wonky candles stamp that has 13 candles in a row.  Used masking techniques and attempted to put no identical candle next to each other, but when assembling that did not work!  Candles were water coloured with distress inks and used a stencil to added some blue background colour.  Glossy accents on the candle flames and a birthday sentiment die on the front bridge element. * * * * * * We had a family get together to celebrate at a local café all to ourselves for a traditional afternoon tea and I made some simple table stands using a birthday grid stamp (white heat embossed) with die cut balloo...

Funky Fossil Birthday Words

Image
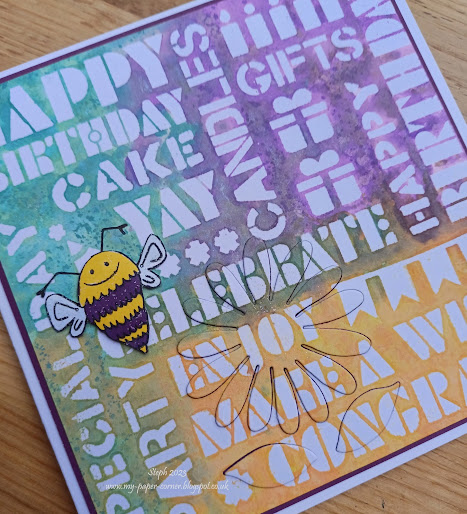
My inspiration for this card was firstly sparked by the August challenge 'Look Who's Talking' on Funky Fossil's FB page where they wanted to see text/numbers and/or sentiments.  I also decided to try out the new-to-me iron-off embossed resist technique. On a panel of smooth white cardstock watermark ink was applied through the birthday words stencil and clear heat embossed.  Three different colourful distress oxide inks were then smooched over the top drying off each one as I went.  Panel was placed on a folded tea towel with copy paper on top and gently ironed which removes the EP.  You need to peel off the copy paper fairly quickly before the EP reside dries or the paper sticks to your project!  But another press with the iron resolves that.  This technique also works well with stamped images. For added dimension and interest I created a die cut eclipse flower which has purple cardstock layers underneath same as the whole panel matt layer.  Cute...

Have a Purrfect Day

Image
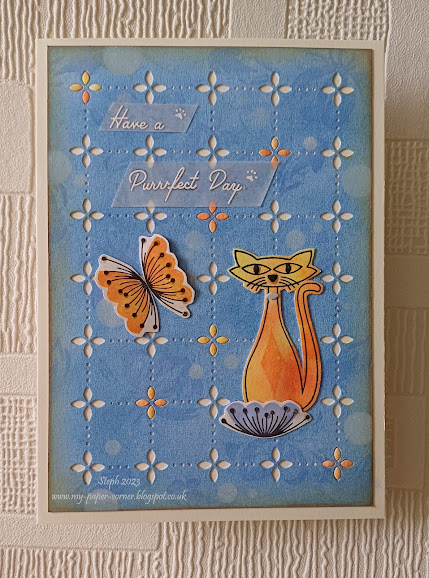
A feline card for a crafty friend's birthday using some new Uniko products from their mid century modern range which I've paired with their pretty quilted background die. On a panel of white card two different blue inks were brushed and blended before over stamping with a floral stamp in a third blue ink to create a subtle tone on tone effect.  Next came some bokeh circles through a stencil with white ink.  This panel was die cut with the quilted background die and edges inked.  The cat was stamped on a scrap piece of brusho card and fussy cut.  Stamped and fussy cut three flowers, one for the cat to sit behind and the other two made the butterfly, which wasn't my original intention the layout just evolved in that way. Once my panel was mounted on the card base and the elements adhered with 1mm foam pads I decided it needed a bit more colour so used the brusho scrap again to die cut and inlay some of the quilted design back in.  Sentiment stamped onto vellum, wh...