Posts

Showing posts from August, 2019

Hanging Basket with Tapestry Stamps

Image
I came across three sets of tapestry peg stamps in one of my local charity shops recently so just had to buy them.  This card uses the Garden of Bee Balm set ... no idea why it's called this as it has azalea buds, berries, leaves & flax which I've stamped to look like a hanging basket with hand drawn wires & stamped loops at the top. I die cut a floral border into the stamped panel then mounted this over some pale purple mulberry paper leaving a small border.  A curved sentiment seemed to work better than a straight one.  I always have plenty of die cut butterflies to hand so chose some in green (from a brusho scrap) to scatter around as it really makes all the difference to the overall look of the card. For a little bit of shine the sentiment was heat embossed with clear EP & I added some glitter pen highlights too on the berries & wires.  I do like the look of these soft pastel tones together. I've used -  6x6" scalloped white ca...

In my garden there is ...

Image
a wild area for nature to do it's own thing ...well I definitely have flowers and bees in my garden, not sure about a beehive/nest though!  This background was started some time ago with Distress Oxides by dabbing my card in the inks spritzed with water and also used some bubble wrap for an added pattern here and there.  As Oxides have a chalky finish when dry I filled the embossed honeycomb shapes with glossy accents which reactivated the colours underneath leaving them vibrant again. Stamps were embossed with clear EP, then just the bee, flower heads & leaves stamped again on yellow card, cut out and fixed on top.  Die cut some foliage and arranged so the beehive was not just hanging in mid air.  To complete the scene the smallest sentiment I have was stamped on a scrap of vellum and tucked under the larger flower head. Finished panel mounted on orange cardstock & onto a green card base cut from an A4 sheet. I've used - 5.25” sq green pearl...

CAS Eclipse Autumn Leaf

Image
This month's challenge at  CAS Stencil  is to use sprays or mists with our stencils so I set about making my own with Brusho powders in a couple of spritzer bottles choosing autumn colours.  I'm so glad I decided to spray outside because it was a messy experience!  After several attempts with different stencils which I wasn't overly happy with the results I settled on this swoosh design. Here you can see most of the elements I've used ... started by die cutting an aperture from my card panel, the circular inside piece was sprayed with yellow and scarlet Brushos through the stencil which blended the colours nicely together.  Once dry the leaf was die cut out and adhered three more die cuts underneath (one white & two dark red) to create the eclipse effect.  Everything slotted back together just like a jigsaw puzzle. I was originally going to add a stamped sentiment until the new  Just Add Ink  challenge popped into my inbox...

CAS Green Man

Image
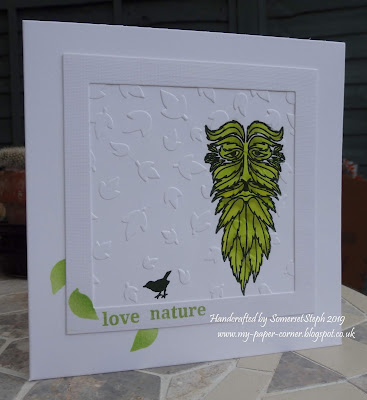
Back in 2016 when I was in the Clarity stamp club this Green Man arrived one month and it’s finally had some inking … he looks more than a little grumpy though!  As Barbara Grey wrote in her step-by-step leaflet ... "Not everybody's cup of tea, although he actually symbolises the cycle of growth and rebirth each spring". I’ve now discovered the Green Man is found in many forms throughout history, and in many different guises, but the common feature is the face covered by foliage … a truly leafy man, often found carved in wood or stone in medieval churches and cathedrals.  The Green Man means different things to different people in this day and age.  I expect to many he represents a figure who is an Environmental guardian “the keeper of the forests and woods”. Anyway back to my card ... he's stamped, coloured with promarkers then embossed over the top with a falling leaves EF (you might just be able to see the embossed pattern over him).  After adding a di...

A Little Summer Fashion

Image
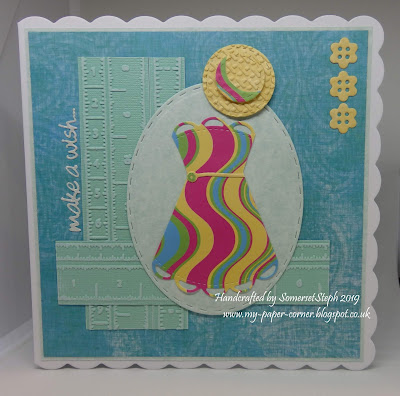
Encouraged by a sketch challenge with friends/members over on docrafts where the theme was ladies fashion I set about making a summer dress and hat using circle dies finding lots of ideas on Pinterest.  I'll never be a seamstress but at least I can create with paper ... It was fairly straightforward to cut into the large scalloped circle once die cut to shape the dress folding the sides behind ... the hat was embossed with a cross stitch EF for a natural straw look (small circle on top of a larger circle) with a little half moon band to match the dress.  Also decided to lightly sand the measuring tapes. I've seen lots of different punch/die art looks on Pinterest for dresses and hats, the possibilities seem endless but I kept mine simple this time.  Hmmm could have made the waist slimmer! Here's the sketch we were following. I've used - 6x6" scalloped edge white card blank Creative Dies stitched/pierced nesting oval M&C Boutique scallo...