Posts

Showing posts from September, 2018

Oriental Birthday

Image
A pretty oriental card to share today using magazine free gift stamps just simply coloured with promarkers, no shading in sight, so the colours are pure, fresh and clean.  I took my colour inspiration from the current  Just Add Ink #428..."Colour" challenge  and the layout from the current  Freshly Made Sketches #356 challenge . The three panels have been raised up with foam pads adding a little fan on the top centre corner.  After the sentiment was embossed it was highlighted with a light brush of tumbled glass distress ink. I've used - 13.5 cm sq card base Neenah ultra smooth solar white card Magazine free gift oriental stamps Promarkers (Mango, Lime Green, Pastel Green, Tea Green, Vanilla) Unbranded dies Opaque White EP Tumbled Glass Distress Ink I'm linking up with: Just Add Ink #428..."Colour"challenge Freshly Made Sketches #356 challenge Thank you for visiting - I'd love you to leave a comment if you have tim

Sugar Skull Day of the Dead Card

Image
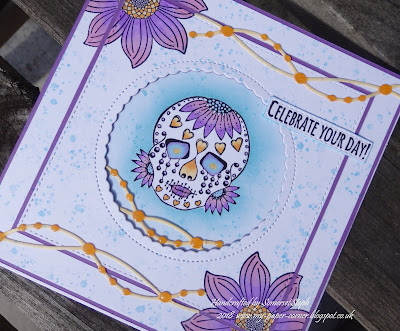
Way back in November 2015 the free cover mount stamp in Craft Stamper magazine was a Sugar Skull stamp design by Darcy Wilkinson and at the time I thought I'd never use it, that is until now ...!  Last year our daughter had her face painted in the style of the Mexican Day of the Dead for a Halloween party so this card design was ideal for her birthday this year. I've coloured the skull with promarkers and inked around the head with a blue distress ink.  Although not quite triple stamping the two corner flowers are using that same technique also coloured with promarkers.   The central aperture panel was then mounted over the skull adding random blue texture with a stamp so as to break up the white.  Finally added some ribbon & jewels die cuts once again coloured with promarkers with glossy accents to highlight the jewels.  The end card is more pretty and flowery than scary! I've used - 13.5cm sq card blank Neenah ultra smooth solar white card Promarker comb

Book Folding Hedgehog

Image
Something a bit different for me to share today a hedgehog letter rack created from a paperback book ... never tried book folding before until now and this was one of the easiest folds to achieve.  Made as an entry in our local Flower Show craft section ... I did achieve 1st prize but then there were only two entries in the "something old from something new" category which most avoided as no one was quite sure what it meant ... me included! Simply decorated with a stamped flower/leaves from a scrap of brusho painted card and some button eyes and nose.  It was a fun project to make and looks quite cute don't you agree. I've used - paperback book Mag freebie stamps Buttons from stash Thank you for visiting - I'd love you to leave a comment if you have time -  Steph x

Bee Happy!

Image
Just love the sentiments on this card, hope it will lift the spirits of the recipient.  For once my card design is made up of die cuts with just the centre sentiment stamped and embossed and used mostly magazine freebies. The patterned paper is foiled so the words catch the light beautifully.  I did follow a sketch from a challenge with members/friends over on docrafts but I decided to move the sentiment to the middle and used a bee instead of a flower/butterfly.  I also coloured the raised parts of the embossing folder (to draw your eye into the centre) and the die cut bee & border with promarkers.  Teeny die cut flowers to embellish.  Here's a close up to show some of the details. I've used -  5x5 scalloped edge card blank top fold Dovecraft foiled patterned paper – mag freebie Bee Happy sentiment stamp, die cut bee & embossing folder all from one mag freebie Scallop edge die - The Works Elizabeth Craft Design ribbon & jewels die Crafters Compa

Thank You Card

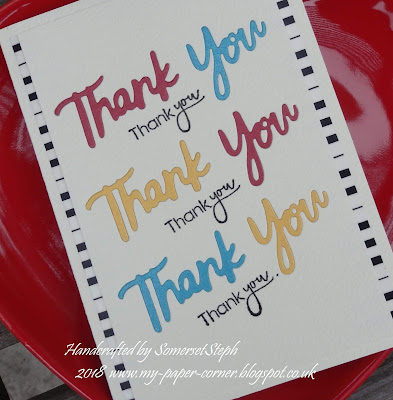
Image
My card to share today was created quite simply by die cutting Thank You three times into a panel at a slight angle and three more times out of red, blue & yellow cardstock, inlaying the coloured pieces back into the panel for an inlaid die cutting technique.   You can never say Thank You enough times don't you agree and one's definitely not enough. I mixed up the colours to give more interest and then heat embossed a small Thank You stamp in between.  The panel was edged with some black & white washi tape before fixing to the front of the card blank. Linking up with  Cut It Up: Challenge #155 - ABCs or 123s  (create a project that has numbers and/or letters on it and also contains die cut) I've used - Textured cream A6 card blank & panel Xcut mini sentiment die Coloured linen metallic cardstock Mag freebie sentiment stamp Washi tape Thank you for visiting - I'd love you to leave a comment if you have time -  Steph x